

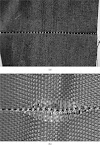
Seam Slippage
• What Is Seam Slippage -
Seam slippage is nothing but the opening of seam. Whenever their is fabric with weak construction the seam becomes weaker and gets separate easily. Which makes seam fail even their is no any rupture or breakage. The stitches are visible from outside when seam slippage occurs.

• Where do we find this problem –
• Trouser inseam
• Shirt armhole
• Jeans waistband
• Furniture upholstery fabric
• The difference between seam slippage and seam strength –
Seam strength refers to the force at which the stitch ends to tear or when the fabric breaks. While before the break there is an unacceptable opening in the stitch which makes the stitch failed even if there is no visible break.
• Reasons For Seam Slippage –
• Weak construction
• Low SPI
• Slippery fabric
• Inappropriate feed mechanism
• Low GSM
• Weak seam type
• Less seam allowance
• Testing Procedure –
Let’s see the procedure for seam slippage
• Preparation –
1. Each specimen of the fabric was cut in the warp and weft direction into 350 mm length and 50 mm width with seam sewn.
2. For the seam slippage testing five samples each of warp and weft was prepared.
• Testing –
1. The clamping device of the machine shall be positioned with the central point of the two jaws in the line of the applied force, the front edges shall be at right angles to the line of applied force and their clamping faces shall be in the same plane.
2. Gauge length is distance between two jaws which should be 200 mm.
3. Constant rate of extension should be set to 100 mm/min.
4. After closing the upper jaw, avoid the pretension when adjusting the test specimen in the lower jaw, so that the fabric hangs under its own weight when the lower clamp is closed.
5. Stop the machine as soon as the seam starts to get open.
6. Record the of seam strength and the seam elongation.
7. Take the average of readings to get the seam strength.
• Precautions –
1. Avoid the readings of the test when
a) Fabric tear
b) Fabric tear at jaws (Jaw break)
2. Consider the readings when seam starts to open.
3. Do not consider the readings of seam break instead of seam opening.
How To Avoid Seam Slippage –
1. Increasing SPI (Stitches per inch)
Increasing SPI is one of the most effective solution to avoid seam slippage. By increasing SPI means by increasing more stitches per inch the strength of the seam will increase so that seam opening won’t be happen.
2. Selecting strong seam type
In seams their are many types like lapped seam, superimposed seam, bound seam, flat seam, etc. Out of which lapped seam is one of the strongest seam. It has more strength as compared to other seam types. So one can avoid seam slippage by choosing lapped seam type while stitching.
3. Using fusing
Usually we use fusing material to increase the strength of specific pattern like collar, cuff, etc. Similarly we can use fusing material at the seam area so that threads will firmly forms stitches and seam will be strong enough to avoid slippage.
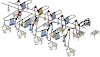
4. Using proper feeding mechanism
While stitching we have to decide which feed mechanism is to choose accordingly to the fabric. Basically their are 6 main types of feeding namely
i. Bottom feed
ii. Needle feed
iii. Differential feed
iv. Bottom and variable top feed
v. Differential bottom and top variable feed
vi. Unison feed.
Out of this bottom and variable top feed is most suitable for avoiding seam slippage. In this feed mechanism their are bottom feed and variable top feed working together to get the best stitching for slippery fabric.

5. Increasing Seam Allowance
Increasing seam allowance gives more amount of fabric to be involved in seam formation, due to which seam gets more stronger with increased strength.
6. Surging
Surging means doing overlock at the edges of the patterns prevents thread slippage. This cause sewing threads strong grip on the seam.
7. Double stitch
Applying double stitch makes more involvement of sewing threads and the fabric which helps to prevent seam slippage.
8. Good thread tension
Sometimes sewing threads runs with wrong thread tension which results in loose stitches, puckering, etc. This also causes seam slippage. So to avoid this, sewing thread should be given proper tension through various tensioners.

9. Aligning Layers
While making seam sometimes operator takes more or less seam allowance which is manual error. So resulted seam does not gain expected strength. To avoid this we can use folders which can take correct amount of seam allowance and resulted seam will have good strength.

Pic credit - https://www.sciencedirect.com


)
1 Comments
Ydenmolamzo1993 Lisa Braun click
ReplyDeletehursiotraxic
If you have any doubts, please don't hesitate to ask